My opinion is that Home Automation should be invisible and “just work”. I don’t have, nor do I want, a control panel or fancy phone app to control my house. Basically, when a problem or lifestyle improvement is identified, your home automation should be able to be configured to handle it without need more of a user interface. And any visitor to your house should not be confused by it or need to read an instruction manual.
I do my automations through Node Red paired with Home Assistant (HA). I find the visual programming environment easier to work with than the automation environment within HA.
Fixing A House Design Issue
This one is trivial and was the excuse to setup a Home Assistant box: Our current house was remodeled by the previous owner and they ended up having the master bath diagonally opposite the water heater. It takes forever for the water in the shower to get warm much less hot.
The previous owner addressed this by putting in a circulation pump. Rather than have the pump run 24/7 she decided to plug a hardware store timer into the receptacle and only run the pump at times that made sense for her lifestyle.
But we have a pretty irregular lifestyle and there isn’t a fixed schedule that can work for us.
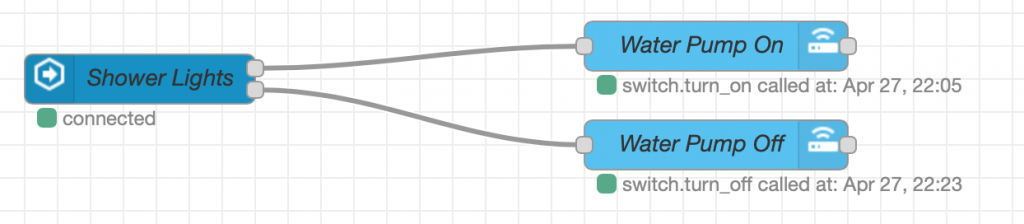
It usually takes me a long time to arrive at simple solutions and that was true this time too. If finally dawned on me that we have lights in the shower that are on a dedicated switch. If the pump could be turned on when the shower lights were turned on we would have hot water available by the time we finished brushing our teeth.
Unfortunately, there is a solid poured concrete foundation wall between the water heater and the master bath with a very small crawl space for access. This is beyond my desire to run a wire in those conditions and we were unable to find an electrician willing to do it either.
But a wireless solution doesn’t need a cable strung through the crawl space. Replace the light wall switch with a Z-Wave compatible one, plug a Z-Wave switch into the receptacle powering the pump, install a Z-Wave controller to slave the pump switch to the shower light switch and “Bob’s your uncle”. Purchase of a RaspberryPi, a Z-Wave controller USB stick, and two Z-Wave devices was cheaper than hiring an electrician. Especially since we had an unused RaspberryPi. Assuming we could have eventually found an electrician to do it.
The Node Red flow for this is so trivial I won’t bother to describe it.
Charging the Plug-In Hybrid
Our plug-in hybrid has a scheduler built in. You can have it start charging at a particular time. Or have it start charging in time to have a full battery when you want to leave.
But our electric company has a fairly complicated Time of Use (TOU) schedule and it is much cheaper at the “super off peak times”. These are:
- Midnight to 6 AM on weekdays.
- Midnight to 2 PM on weekends and holidays.
- 10 AM to 2 PM weekdays during March and April.
There is no way our car can be programmed to do that. But Node Red with the node-red-contrib-light-scheduler can do it with out too much trouble.
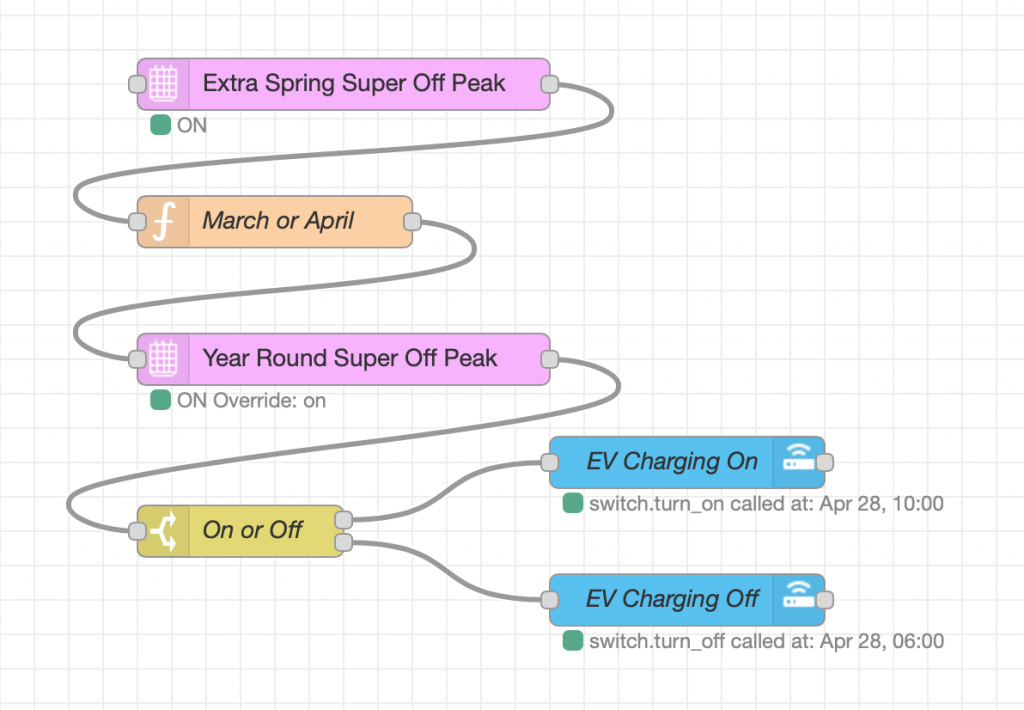
The timer node for “Extra Spring Super Off Peak” sends a “on” message for the 10 AM to 4 PM weekday times that might be off peak. That message goes through the “March or April” function. All that does is pass the message through if it is March or April or kill it (set to null) if it is some other month.
var date = new Date();
var current_month = date.getMonth();
//
// Months start a 0 so March is 2 and April is 3
//
if ((current_month < 2) || (current_month > 3)) {
msg = null;
}
return msg;
If it is March or April “on” or “auto” message then arrives at the main “Year Round Super Off Peak” to override its schedule. The “Year Round Super Off Peak” timer knows about the usual weekday and weekend schedule. When in “auto” it will run its normal weekday and weekend schedule.
The output of that, either a true or false, is then checked by the “On or Off” node and then sent to the appropriate service node for action.
Actions to take when we leave or come home
Porch Light
Our front door is down the side of the house and it can be dark enough to have trouble finding the keyhole. I detest motion triggered lights, my experience has been that there are too many false alarms. And I’d rather not have the lights come on for an uninvited stranger or opossum.
But it would be nice if the porch lights came on for us but not for other uninvited people.
Robotic Vacuum
With our irregular schedule, programming the robotic vacuum has the same types of issues as the hot water circulation pump timing. It would be nice if the vacuum detected that we had left the house and start vacuuming then.
The automations
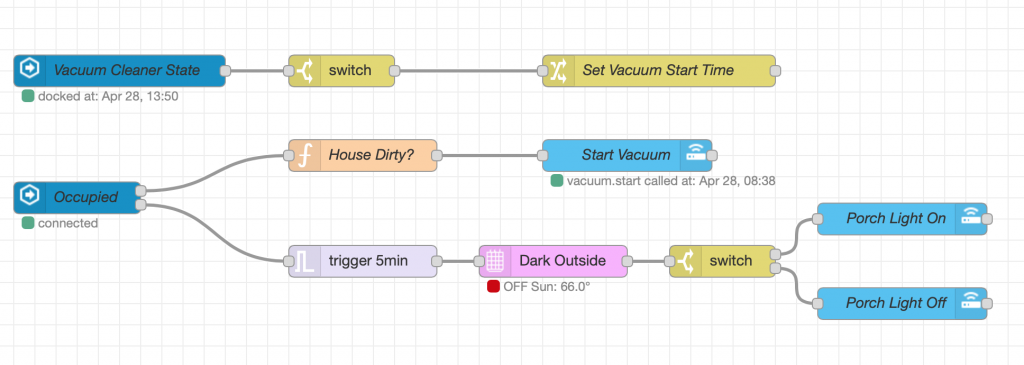
The top sequence watches for when the robotic vacuum has started. The “Vacuum Cleaner State” will emit a string giving the new state. The “switch” node only passes through the “cleaning” messages. And the “Set Vacuum Start Time” simply stores the current time in a flow variable accessible to other sequences on this page/flow. Note that it doesn’t matter why the robotic vacuum started (button on vacuum, smartphone app from the vacuum manufacturer, button on Home Assistant web page, Node Red automation, etc.). If the vacuum started for any reason Node Red will detect it and remember the time.
The “Occupied” node watches the home occupied value within Home Assistant. Possible values of that are either “home” or “not-home”.
Leaving The House
The “not-home” messages from the “Occupied” node are sent to the “House Dirty?” function. That has a little JavaScript that checks the flow variable holding the time the vacuum cleaner was last started and the current time. If enough time has passed, the message is allowed through otherwise it is killed. I’ve set the time to a value large enough that the vacuum will not run twice in one daytime period but small enough that it can run the following morning if it ran the afternoon before.
// Time stamps appear to be in milliseconds
// Compute hours since last time the vacuum started
var last_start = flow.get('vacuum_start')||0;
var now = new Date();
var time_now = now.valueOf();
var delta_hours = (time_now - last_start)/3600000.0;

// If it has been a a while since the vacuum
// last ran, then continue on.
if (delta_hours >= 18.0) {
    msg.payload = delta_hours;
    return msg;
}

return null;
If the message gets through it ends up at the “Start Vacuum” node which tells Home Assistant to start the robotic vacuum.
Returning home
If the “Occupied” node detects a transition to “home” (i.e. we just arrived) the message is sent to the “Trigger 5min” node. The trigger node immediately sends a “light-only” message then after five minutes sends a “auto” message.
The “Dark Outside” timer node is configured so that the “light-only” message will only get through if it is dark outside. The “auto” message that follows five minutes later puts it back into auto mode, which in this case is light off all the time.
Finally, the message is handled like all the rest of the on/off messages with a switch node used to decide to send the message to a on service or an off service.
Now, returning at night, when one of our phones connects to WiFi (and I made sure we have a strong WiFi signal to the front of the house) the porch light comes on for five minutes. Enough to get things out of the car, walk to the door and unlock it.
Summary
These simple automations
- Require no control panel.
- Make life easier when they function.
- Do not remove local control.
- Do not make live horrible if they break.
- Require no Internet access to run. Everything is local to our house.
I think all automations should meet these criteria.